Showing posts with label boys. Show all posts

Friday, 16 October 2009

jumping jellyfish

so i ended up making the jellyfish on my own as mr james didn't seem very interested in helping (but took all the credit mind you!)

anyway, here's a little tutorial if you're interested in giving it a go yourself :)


ingredients:
plastic drink bottles, ends cut off
(you could use yogurt tubs or similar)
different types of ribbon/string/yarn
different sizes bobbly things
(i got mine in a kids craft kit from kmart)
piece of net curtain*
pair of girls opaque stockings**
shiny stickers
sticky tape (for just in case you need it)
hole punch
scissors


steps (from left - right, reading across)
(you can click on the image to make it bigger)

  • cut the ends off of the bottles & punch holes around edges
  • cut one leg of the stockings off & then cut into strips (you could use the other leg to make a snake hand puppet or a snake softie perhaps)
  • remove the toe end & pull the strips so that they go thin & curly
  • separate your yarn & cut your ribbons, net curtain etc
  • tie the pieces through the holes you punched
  • sew your bobbly bits onto a long piece of thread
  • (i sewed through once, then back through again so they wouldn't slide down/off the thread)
  • i stabbed a couple of holes in the top of my jellyfish to hold the string it would hang from & threaded that through, tying it off with a knot (see close up below)
  • i then tied the thread with the bobbly bits onto this string on the inside of the bottle base (inside the jellyfish head)

  • stick your shiny & sparkly sticker things all over the jellyfish head
  • hang it up & you're done!
 

you could use any colours or pieces of ribbon/fabric scraps that you have on hand, i happen to have a son whose favourite colour is blue & i had everything else in my craft drawers
 
*  the net curtain is from when i used to make my own felt from scratch, i used to roll it up in the net curtain & a bamboo blind but that's a whole other story!

**  i got the girls opaque stockings at the salvation army shop, two pairs for 50c so i got lots in different colours for you-never-know-when

the main thing is that you use your & your kids' imaginations & have fun together :D


james' jellyfish
(i'm just happy he tried)

have a great weekend kids!
we're going to look at yet more houses so fingers crossed something comes up that we'll like :)

adios amigos
x

Wednesday, 14 October 2009

cranky pants

so i'm feeling cranky today, mostly due to "womanly business" but also because it's been raining again (what happened to spring?) & the kids are going stir crazy - not helping my current "fragile" state (of mind)

anyway!  i was going to do a fun activity with them at some point today but didn't get around to it because i was finishing up more soft blocks for my shop & trying to take half decent photos in the kitchen at the table...  sigh...  rain is good, we need the rain (repeat)

so the fun activity will have to be postponed until tomorrow, at least i will just have one kid to entertain as matthew is going to nanna & pa for the day  :)  one is so much easier than both of them squabbling over the same toilet roll insert/raisin/piece of thread one of them found on the floor (can you tell i'm a leetle beet over eet?)

here's a little sneak peek of what we're going to do, i'm pretty excited about it i'm even thinking of doing another tutorial!  woo hoo!


i know the "e" is upside down,
the magnets were being freaky :)

check back tomorrow for more, gotta go now - james has done something & matthew is screaming his head off (again)

adios amigos
x

PS  thanks for stopping by if you found me via one pretty thing!

PPS  there is an awesome tutorial on there today for fabric alphabet magnets, definitely going to give that one a go!

PPPS  more soft activity blocks available in my shop now :)

Sunday, 11 October 2009

finally finished & a little tutorial to boot (arrrgh!)

hi!

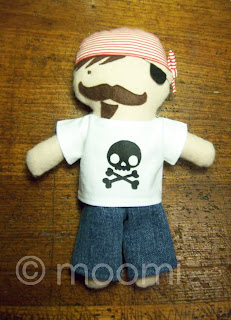
i've finally finished the 3 pirates, but as it's night now the photos i took are shockin' so i'll do more tomorrow

thanks for your feedback guys, i decided to keep all three types of facial hair & let people choose which they prefer, along with eye colour too :)

i also stenciled a pirate-y skull & cross bones design i came up with last night after trawling the internet for ideas!  another late night to bed (around midnight) & then i couldn't sleep properly because i was thinking...

anyway, i thought i'd do a little tutorial for the stenciling as it was SO easy & SO much fun :)

so, firstly we have a little list of "ingredients":

  • a printer to print your image (or you could do a free hand drawing)
  • fabric paint
  • fabric item to stencil onto
  • a small sponge (in this case, but depending on the size of your stencil you may need a bigger one)
  • freezer paper (apparently this is readily available in the supermarkets in the states, i had to order mine from this quilting shop here in oz)
  • a pencil or a marker to trace your image
  • nice sharp scissors, i like to use these 
  • an iron
  • a clean piece of fabric for setting your image with the iron once paint is dry
i've done a photo tutorial, but it's my first so please let me know if something doesn't make sense :)  here goes!


trace your image using an
extremely high tech light box


well, it's not really a step as such but
here is your (my) traced image :)


carefully cut out your image


place your stencil on top of the item
you're stenciling & iron on with a hot iron
(not steam)


add any extra bits (in this case the
eyes & the nose are added)


once the stencil is in position,
insert a piece of cardboard
to prevent the paint seeping
onto the other side


again, it's not really a step, but here
is your (my) cardboard inserted behind
my fabric with the stencil on top


prepare your paint & sponge


take a small amount of paint onto
your sponge & dab in onto/over
your stencil - you really don't need
a lot for this small image & a little bit
goes a long way


stencil covered with paint
now wash your sponge etc & wait
for the paint to dry (i hung mine out
on the line as it was a sunny day today)


once the paint is dry, take your spare
piece of fabric and place it over the image
have your iron set to hot (no steam) & iron
the image over the spare fabric for a few
minutes*
 voila!
(my first time ever so please excuse the
not-so-good bones) :)


 here is one of the pirates
with his new shirt, terrible
photo but it's late & dark

and there ya go, i'll do more photos tomorrow hopefully (if it's not raining again as it did every other day i wanted to take some before) & the guys will hopefully be up in the shop in the next couple of days - hooray!!

*my paint instructions said the iron should be
at 100C but i don't know exactly what that is on
my iron so i just set it to hot, & then to iron the image
for 3 - 5 minutes to set it

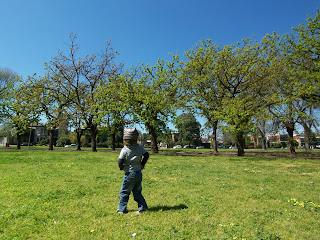
i'll leave you with some photos from our day yesterday after we lost out on yet another house at auction (it's becoming quite funny now, i can laugh or i can cry & i think it's less exhausting to laugh)  :D


two happy crazies at the gorgeous green edinburgh gardens (result: a good loooong nap for both of them, yeah baby!)

night kids
x